Hawaiki Slice 5

Image Analysis for Green & Blue Screens

What’s New

Keying Technique

System Requirements

macOS: macOS 11.5.1 Big Sur +, macOS 12 Monterey +, macOS 13 Ventura +, macOS 14 Sonoma +

FxFactory: 8.0.3 +

Apps: Final Cut Pro 10.6 +, Motion 5.6 +, Premiere Pro 14 +, After Effects 17 +

Tutorials

New in Hawaiki Keyer 5

Intro

Primary and Secondary - Basics

Screen Clean

Introduction

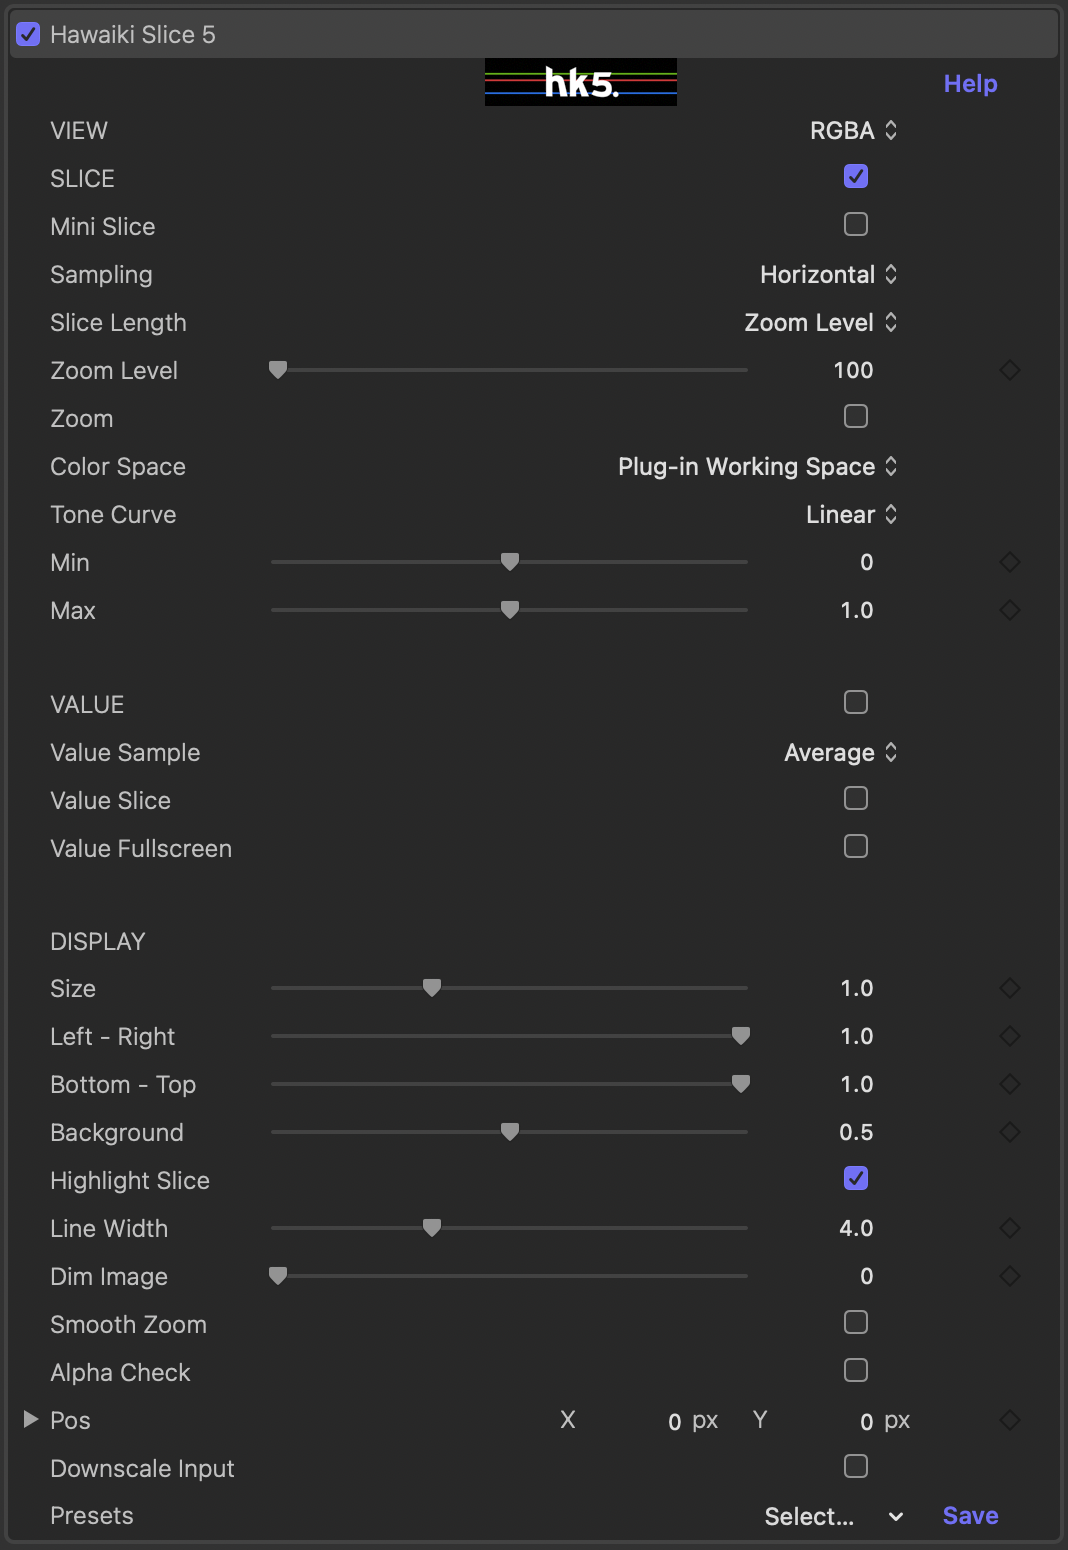
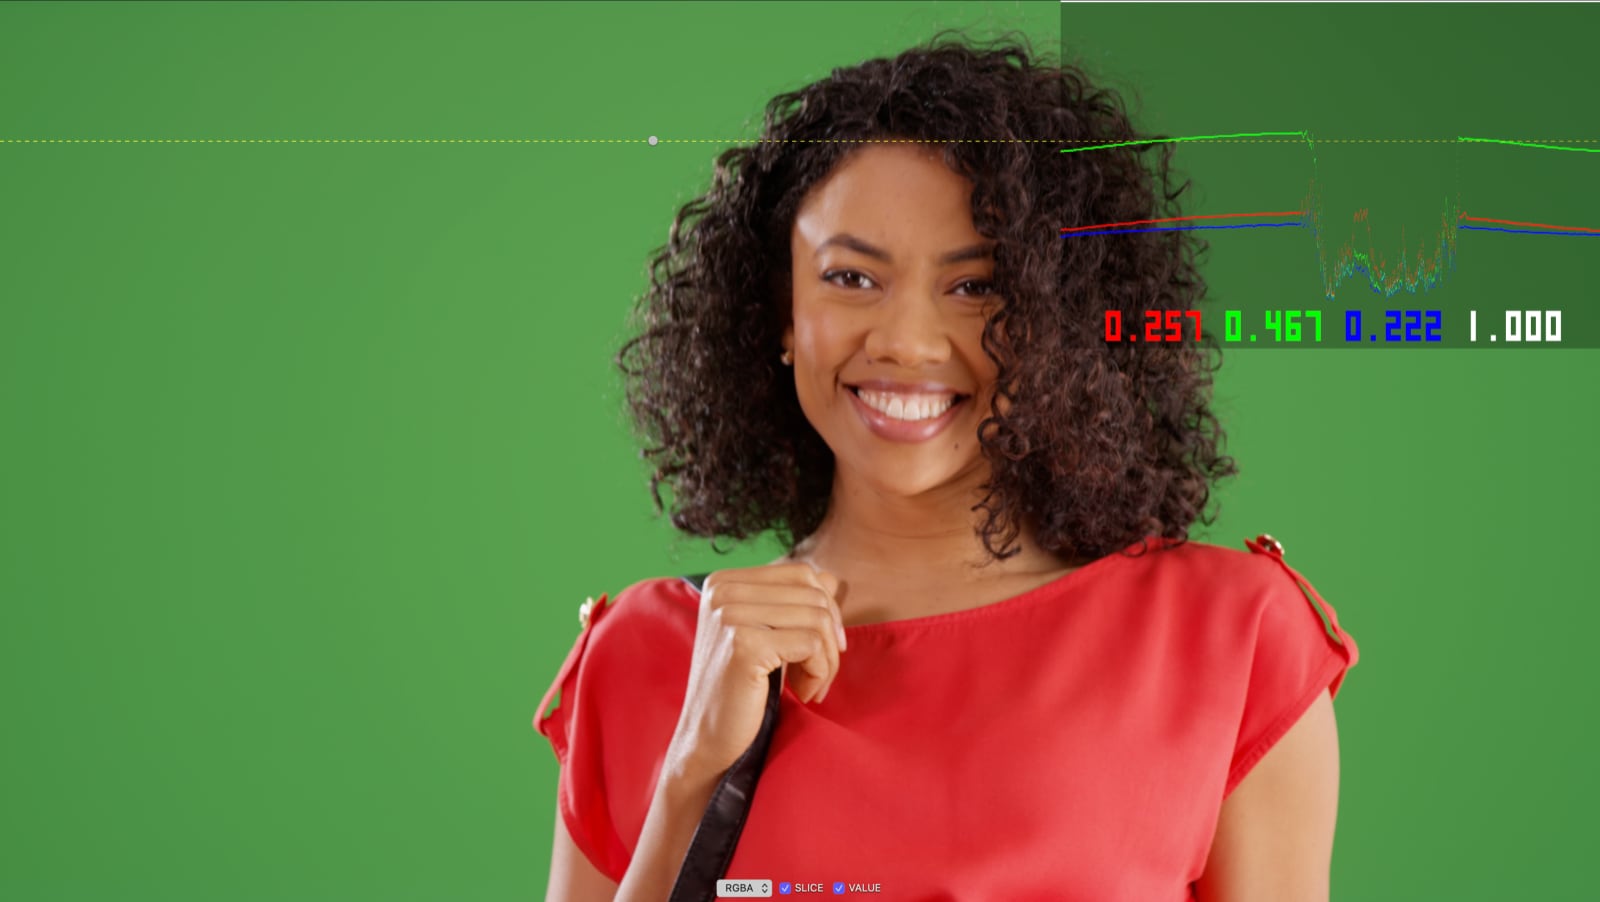
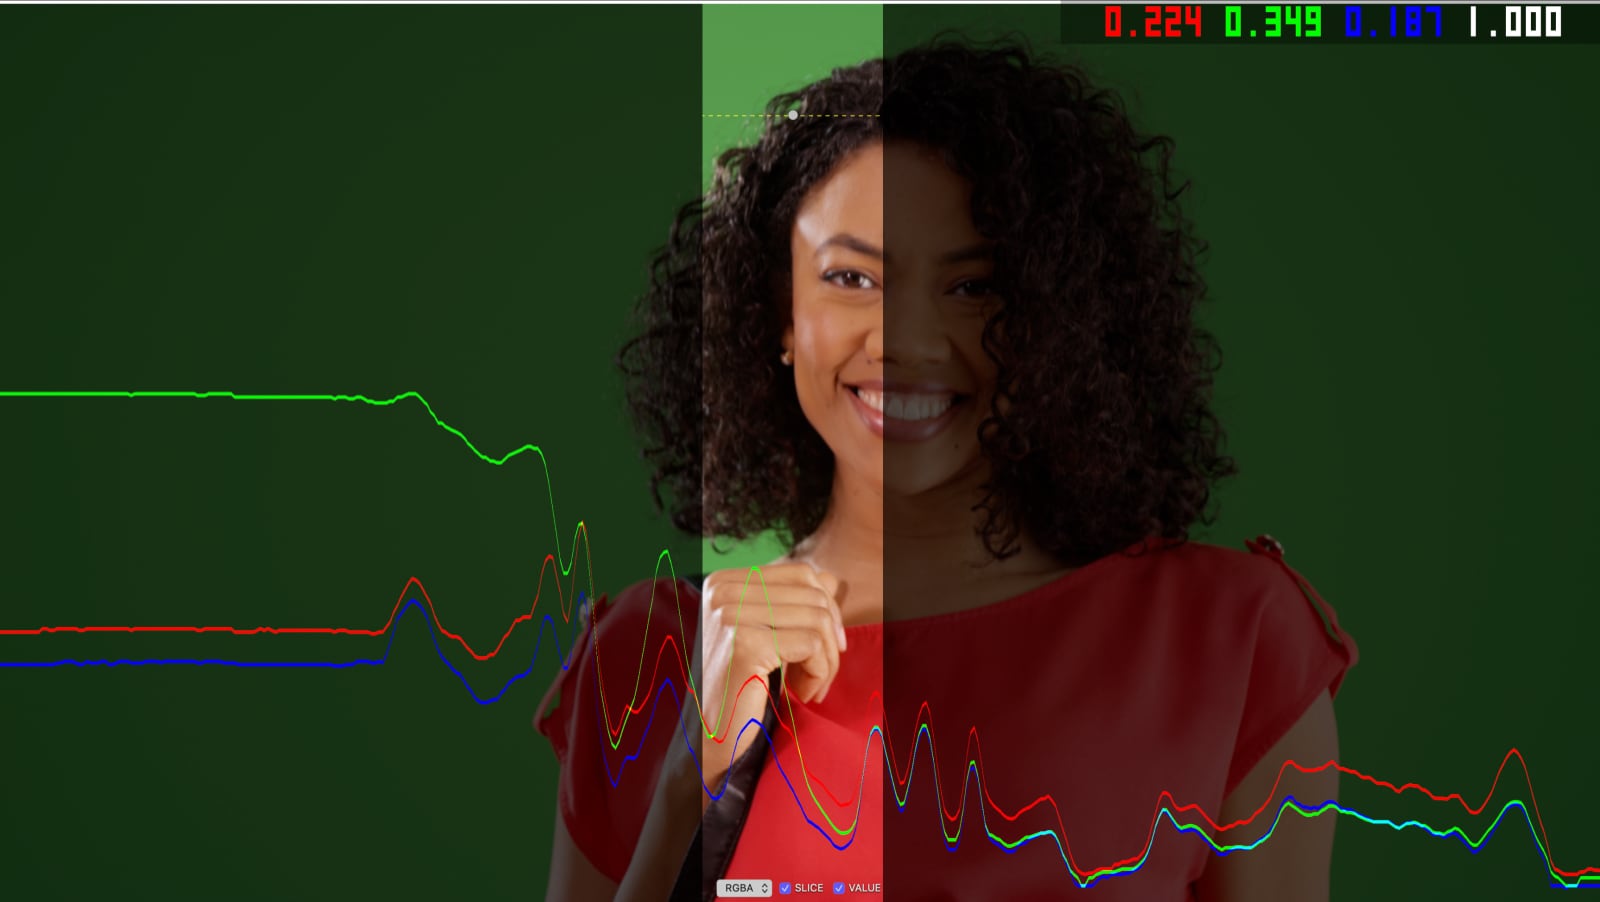
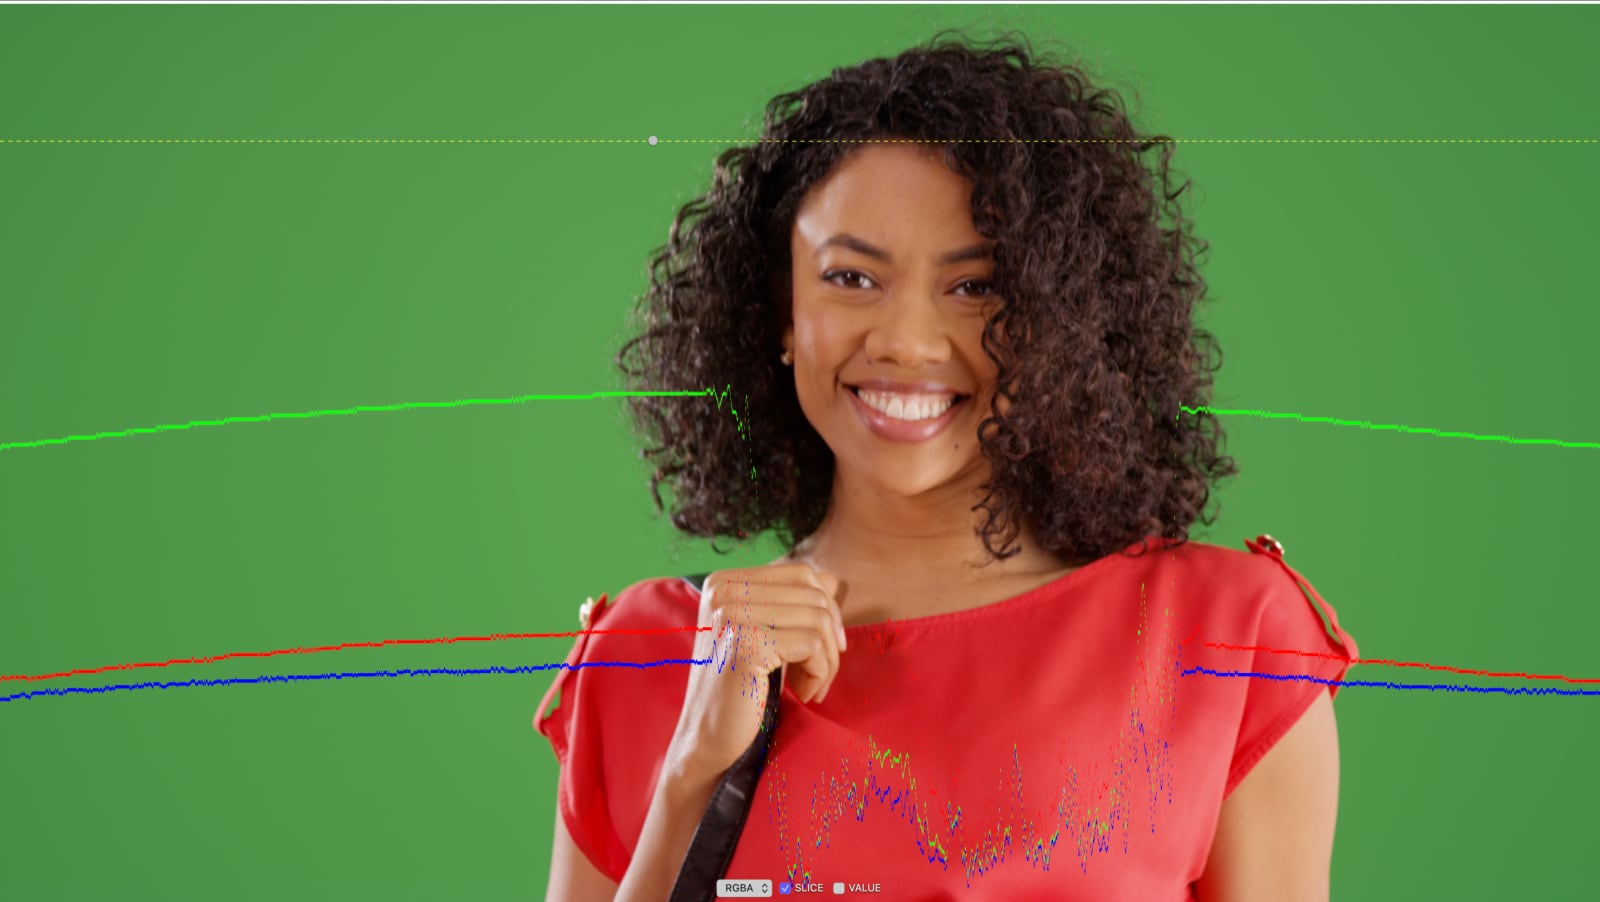
When you first add Hawaiki Slice to a clip the slice graph showing the red, green, blue and alpha values as lines will appear along with yellow dotted line that indicates the slice of the frame that you are sampling. Moving the onscreen point control up and down changes the row that is sampled. Moving it left and right controls the centre of the zoomed area when the zoom level is greater than 100%. NB. When sampling is set to Vertical moving the OSC left and right sets the column that is sampled and up and down controls the centre of the zoom.


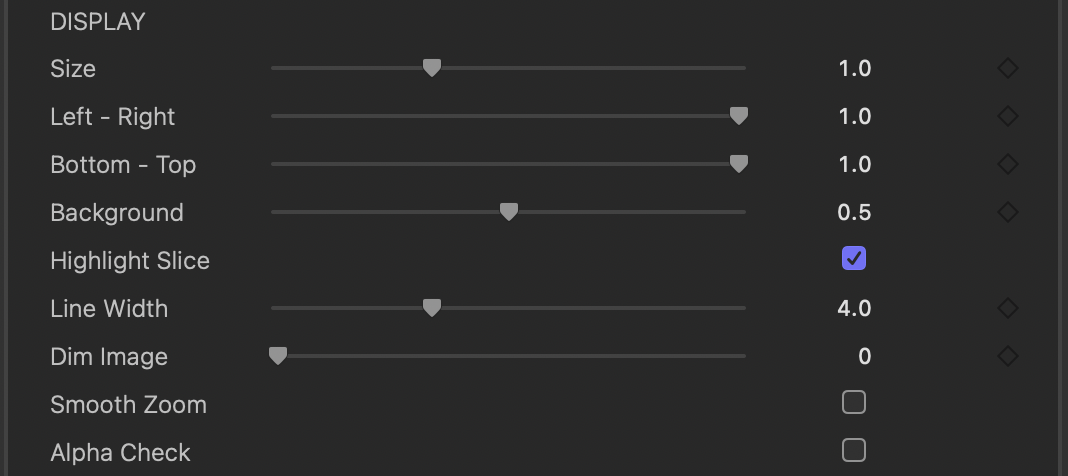
By default Hawaiki Slice uses the full width and height of the frame to display the slice graph, so in horizontal mode the top of the frame is set to the Max value (defaults to 1) and the bottom is set to the Min (defaults to 0) and when a vertical slice is sampled the left of the frame is the Min value and the right the Max.

Compatibility

Hawaiki Slice 5 is compatible with Final Cut Pro, Motion, Premiere Pro and After Effects.

Parameters

VIEW


VIEW- Switch the channel(s) displayed: options RGBA - normal Color image, Red, Green, Blue, Alpha and the Max view - a three-colour view that shows which of the three channels is the dominant one in each area of the image - useful for identifying issues with green and blue screens. NB. This menu is also available onscreen in Final Cut Pro X and Motion.

The following options are available:

SLICE

On by default.

SLICE

Turn the onscreen slice display on and off.

NB. This checkbox is also available as an onscreen control in Final Cut Pro and Motion.

Mini Slice

Off by default.

Shrinks the slice graph to a portion of the screen. The size and position of the Mini Slice graph can be set with the Display controls below.


Square

Off by default.

Shown when Mini-Slice is enabled - Overrides the frame aspect ratio so that the Mini Slice graph is displayed as a square similar to the waveform displays available in most host applications.

Sampling

Switch between a horizontal and vertical slice of the image.

The following options are available:

Slice Length


Switch between setting the slice length either using the Zoom level or the Pixels slider that replaces Zoom Level when Pixels is selected.


The Pixels option is handy if you're only wanting to sample a small area.

The following options are available:

Zoom Level

Set to 100 by default.

The slider is limited to values between 100 and 1600 but you can type values between 100 and 100000 by clicking on the current value in the inspector.

Allows you to zoom in on a portion of the image and see a more detailed slice - the slice graph updates and the area excluded is darkened. NB. the slice is zoomed around the centre of the onscreen control.


Pixels

Set to 50 by default.

The slider is limited to values between 1 and 100 but you can type values between 1 and 4000 by clicking on the current value in the inspector.

Set the width of the slice in pixels.

Zoom

Off by default.

When enabled the background image is zoomed as well so the slice graph aligns with the image pixels (except when Mini Slice is enabled, see below).


Color Space

Select the Color Space that Hawaiki Slice displays - both the Slice graph and Values display will update when this is changed.

New in HK5

The following options are available:

Tone Curve

Select the Tone Curve (transfer function) that Hawaiki Slice displays - both the Slice graph and Values display will update when this is changed.

New in HK5

The following options are available:

Gamma

Set to 1.96 by default.

The slider is limited to values between 0 and 3 but you can type values between 0 and 100 by clicking on the current value in the inspector.

Apple HLG

Off by default.

Uses the HLG encoding adopted by Apple’s HLG color spaces.

Min

Set to 0 by default.

The slider is limited to values between -1 and 1 but you can type values between -10 and 100 by clicking on the current value in the inspector.

Sets the bottom of the slice graph range - defaults to 0, reduce to show out of range values. NB. If you take the Min value below 0 a dotted white line appears to indicate zero.

Max

Set to 1 by default.

The slider is limited to values between 0 and 2 but you can type values between -10 and 100 by clicking on the current value in the inspector.

Sets the top of the slice graph range, defaults to 1, increase to show out of range values.

VALUE

Off by default.

VALUE

Turns on the RGBA display that shows the numerical value of the slice.

NB. This checkbox is also available as an onscreen control in Final Cut Pro and Motion.


Value Sample

Switches the value displayed between an Average of all the pixels in the slice or when switched to “Pixel” the option to step through each of the pixels. The Slice Pixel slider appears allowing you to step through the slice (0 samples the left most pixel, 1 the right) and the pixel sampled is shown on the slice guide.

The following options are available:

Slice Pixel

Set to 0 by default. Only values between 0 and 1 are allowed.

Value Slice

Off by default.

Updates the slice graph to show only the current value as selected in Value Sample.

Value Fullscreen

Off by default.

Displays the value as a fullscreen colour - useful if you need a swatch value that is an average of a group of pixels and to provide a larger target if you want a swatch value for a single pixel. NB. Updating the View menu cycles through the channels of this sample.

DISPLAY


Size

Set to 1 by default.

The slider is limited to values between 0.5 and 2 but you can type values between 0.5 and 3 by clicking on the current value in the inspector.

Set the size of the Value readout and Mini Slice graph

Left - Right

Set to 1 by default. Only values between 0 and 1 are allowed.

Position the Value readout and Mini Slice graph.

Bottom - Top

Set to 1 by default. Only values between 0 and 1 are allowed.

Position the Value readout and Mini Slice graph.

Background

Set to 0.5 by default.

The slider is limited to values between 0 and 1 but you can type values between 0 and 0 by clicking on the current value in the inspector.

Sets the opacity of the Mini Slice and Value background.

Highlight Slice

On by default.

Highlight the zoomed section of the image.

Line Width

Set to 4 by default. Only values between 1 and 10 are allowed.

Sets the width of the slice graph lines.

Display Horizontal

Off by default.


Visible when Sampling is set to Vertical - displays the vertical slice graph horizontally (bottom -> top gets mapped to left -> right). May be more intuitive for some users, especially when used in tandem with Square in Mini-Slice mode.

Dim Image

Set to 0 by default.

The slider is limited to values between 0 and 1 but you can type values between 0 and 0 by clicking on the current value in the inspector.

Darkens the image - useful if you can't see the slice graph because the image colours are close to the slice graph colours.

Smooth Zoom

Off by default.

Smooths the zoomed image so individual pixels aren’t visible.

Alpha Check

Off by default.

Works like Matte Check in the Keyer modules, applies a slight gamma correction to the alpha channel view so you can see stray pixels that are not cleared.

Pos

A point parameter centered in the frame by default.

Initial location in the frame
How do I adjust the location on-screen?
Reflects the position of the onscreen point control.

Downscale Input

Off by default.

Improves realtime playback with 5k+ footage on older and entry level Macs.

Scale

Set to 0.5 by default.

The slider is limited to values between 0.2 and 1 but you can type values between 0 and 1 by clicking on the current value in the inspector.

Presets

Presets contain a snapshot of your effect configuration. While no built-in presets are available, you can still save and load your own preset files.

When you save parameter configuration to a file on disk, this file can later be loaded to recreate the same effect configuration. Presets generated in one video application can be used by the same plug-in running in a different video application.

How do I use the presets popup menu?

Allows you to save a custom layout for Hawaiki Slice.