Hawaiki Comp Tools 5

Advanced Compositing Tools

What’s New

Keying Technique

System Requirements

macOS: macOS 11.5.1 Big Sur +, macOS 12 Monterey +, macOS 13 Ventura +, macOS 14 Sonoma +

FxFactory: 8.0.3 +

Apps: Final Cut Pro 10.6 +, Motion 5.6 +, Premiere Pro 14 +, After Effects 17 +

Tutorials

New in Hawaiki Keyer 5

Intro

Primary and Secondary - Basics

Screen Clean

Compatibility

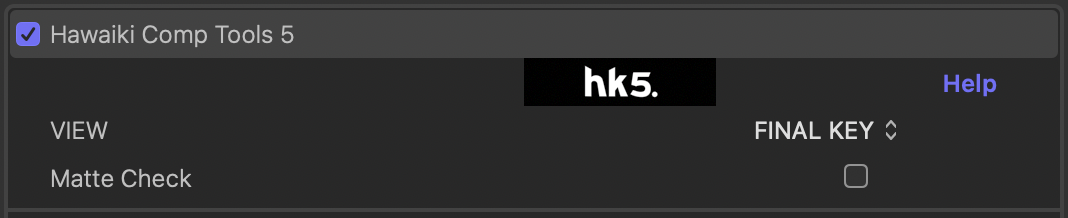
Hawaiki Comp Tools 5 is compatible with Final Cut Pro, Motion, Premiere Pro and After Effects.

Parameters

VIEW


VIEW Menu

Hawaiki Comp Tools provides a comprehensive set of view modes to make it easy to setup and refine your composite. In Final Cut Pro and Motion (but not the Adobe hosts) there are onscreen buttons and menus for selecting the views which are duplicates of the Inspector controls.

View Menu

View Menu

The following options are available:

Matte Check

Off by default.

Provides a gamma correction to the matte view so you can easily spot pixels in the background that are not clear. Leave off to have the Matte view match the alpha channel view of the host.


MATTE

New in HK5

Enable

Off by default.

Enable the Matte controls.

Gain

Set to 1 by default.

The slider is limited to values between 0 and 3 but you can type values between 0 and 100 by clicking on the current value in the inspector.

Scales the matte.

Gamma

Set to 1 by default.

The slider is limited to values between 0 and 3 but you can type values between 0 and 100 by clicking on the current value in the inspector.

The Gamma slider performs the magic trick of making your transparent edges either more opaque or more transparent - increase the value for greater transparency and reduce it for increased opacity. This is a great control for making your edges look more realistic, but, as always, be sure to use it gently and don't overcook the results.

Clip Black

Set to 0 by default. Only values between 0 and 0.99 are allowed.

The black and white Clips allow you to adjust the matte in the conventional way, in other words by clipping either the black or white values or both - clipping the black cleans up the background, and clipping the white solidifies the foreground.

Clip White

Set to 1 by default. Only values between 0.01 and 1 are allowed.

Shrink - Grow

Set to 0 by default.

The slider is limited to values between -5 and 5 but you can type values between -50 and 50 by clicking on the current value in the inspector.

Contract or expand the matte.

New in HK5

Blur

Set to 0 by default.

The slider is limited to values between 0 and 20 but you can type values between 0 and 200 by clicking on the current value in the inspector.

Blurs the matte using a gaussian blur. The slider sets the blur radius.

Matte Cleaner

Off by default.

Matte Cleaner

Matte Cleaner is designed to help you deal with problem areas in your foreground that refuse to go solid. At extreme settings you can use Matte Cleaner to force fill "holes" in your foreground caused by reflections or foreground colors that too closely match the background screen color. Check the Matte Cleaner switch to enable this option, and adjust the Amount slider as necessary. For advanced hole filling operations you will probably also want to use the Fill Holes slider which helps to force the filler into more of the holes.

Note that while Matte Cleaner is a really powerful tool, like any keying control you want to make sure that you only use as much as you actually need and no more - at extreme settings you can risk compromising your edges, so keep an eye on them to make sure you're doing enough but no more.

COMPOSITING TIP: If your foreground holes are caused by reflections, it's worth knowing that filling them in is not always the best-looking option. Being reflections they should ideally be reflecting your environment, and in your final composite that environment isn't the flat color of your despilled green/blue screen (which is what it will be if you fill them in), but rather it ought to be the color of the new background and any detail it may contain. Hence leaving your holes see-through will often have the effect of making them look more like real reflections and your composite will look better as a result.

Amount

Set to 0.1 by default. Only values between 0 and 1 are allowed.

Fill Holes

Set to 0 by default.

The slider is limited to values between 0 and 20 but you can type values between 0 and 50 by clicking on the current value in the inspector.

POST Gain

Set to 1 by default.

The slider is limited to values between 0 and 3 but you can type values between 0 and 100 by clicking on the current value in the inspector.

Gamma

Set to 1 by default.

The slider is limited to values between 0 and 3 but you can type values between 0 and 100 by clicking on the current value in the inspector.

Clip Black

Set to 0 by default. Only values between 0 and 0.99 are allowed.

Clip White

Set to 1 by default. Only values between 0.01 and 1 are allowed.

Invert

Off by default.

Invert the matte.

IMAGE

New in HK5

COLOR

Off by default.

Hawaiki Comp Tools gives you an entire color correction suite so you can polish your composite all from within the one plug-in.


Exposure

Set to 0 by default.

The slider is limited to values between -5 and 5 but you can type values between -16 and 16 by clicking on the current value in the inspector.

Temperature

Set to 0 by default.

The slider is limited to values between -100 and 100 but you can type values between -120 and 120 by clicking on the current value in the inspector.

Tint

Set to 0 by default.

The slider is limited to values between -100 and 100 but you can type values between -200 and 200 by clicking on the current value in the inspector.

Hue

Angle set to by default.

Value must be between and .

Color Space

Set the Color Space of all of all Color parameters below this menu.

NB. Exposure, Temperature, Tint and Hue operations are always performed in the default linear color space of the plug-in.

New in HK5

The following options are available:

Tone Curve

Set the Tone Curve (transfer function) of all Color parameters below this menu.

New in HK5

The following options are available:

Input Gamma

Set to 1.96 by default.

The slider is limited to values between 0 and 3 but you can type values between 0 and 100 by clicking on the current value in the inspector.

Apple HLG

Off by default.

Uses the HLG encoding adopted by Apple’s HLG color spaces.

CONTRAST

Set to 0 by default.

The slider is limited to values between -1 and 1 but you can type values between -1 and 10 by clicking on the current value in the inspector.

New in HK5

Pivot

Set to 0.5 by default.

The slider is limited to values between 0 and 1 but you can type values between -1 and 100 by clicking on the current value in the inspector.

PRE-SATURATION

Set to 1 by default.

The slider is limited to values between 0 and 2 but you can type values between 0 and 10 by clicking on the current value in the inspector.

L

Set to 1 by default.

The slider is limited to values between 0 and 2 but you can type values between 0 and 10 by clicking on the current value in the inspector.

M

Set to 1 by default.

The slider is limited to values between 0 and 2 but you can type values between 0 and 10 by clicking on the current value in the inspector.

H

Set to 1 by default.

The slider is limited to values between 0 and 2 but you can type values between 0 and 10 by clicking on the current value in the inspector.

OFFSET

Set to 0 by default.

The slider is limited to values between -1 and 1 but you can type values between -100 and 100 by clicking on the current value in the inspector.

R

Set to 0 by default.

The slider is limited to values between -1 and 1 but you can type values between -100 and 100 by clicking on the current value in the inspector.

G

Set to 0 by default.

The slider is limited to values between -1 and 1 but you can type values between -100 and 100 by clicking on the current value in the inspector.

B

Set to 0 by default.

The slider is limited to values between -1 and 1 but you can type values between -100 and 100 by clicking on the current value in the inspector.

LIFT

Set to 0 by default.

The slider is limited to values between -1 and 1 but you can type values between -2 and 2 by clicking on the current value in the inspector.

R

Set to 0 by default.

The slider is limited to values between -1 and 1 but you can type values between -2 and 2 by clicking on the current value in the inspector.

G

Set to 0 by default.

The slider is limited to values between -1 and 1 but you can type values between -2 and 2 by clicking on the current value in the inspector.

B

Set to 0 by default.

The slider is limited to values between -1 and 1 but you can type values between -2 and 2 by clicking on the current value in the inspector.

Lift Pivot

Set to 1 by default.

The slider is limited to values between 1 and 10 but you can type values between 0.1 and 100 by clicking on the current value in the inspector.

Set the pivot point for the lift sliders. Values above this are left unchanged.

New in HK5

GAMMA

Set to 1 by default.

The slider is limited to values between 0 and 2 but you can type values between 0 and 100 by clicking on the current value in the inspector.

R

Set to 1 by default.

The slider is limited to values between 0 and 2 but you can type values between 0 and 100 by clicking on the current value in the inspector.

G

Set to 1 by default.

The slider is limited to values between 0 and 2 but you can type values between 0 and 100 by clicking on the current value in the inspector.

B

Set to 1 by default.

The slider is limited to values between 0 and 2 but you can type values between 0 and 100 by clicking on the current value in the inspector.

GAIN

Set to 1 by default.

The slider is limited to values between 0 and 2 but you can type values between 0 and 100 by clicking on the current value in the inspector.

R

Set to 1 by default.

The slider is limited to values between 0 and 2 but you can type values between 0 and 100 by clicking on the current value in the inspector.

G

Set to 1 by default.

The slider is limited to values between 0 and 2 but you can type values between 0 and 100 by clicking on the current value in the inspector.

B

Set to 1 by default.

The slider is limited to values between 0 and 2 but you can type values between 0 and 100 by clicking on the current value in the inspector.

SATURATION

Set to 1 by default.

The slider is limited to values between 0 and 2 but you can type values between 0 and 10 by clicking on the current value in the inspector.

New in HK5

L

Set to 1 by default.

The slider is limited to values between 0 and 2 but you can type values between 0 and 10 by clicking on the current value in the inspector.

M

Set to 1 by default.

The slider is limited to values between 0 and 2 but you can type values between 0 and 10 by clicking on the current value in the inspector.

H

Set to 1 by default.

The slider is limited to values between 0 and 2 but you can type values between 0 and 10 by clicking on the current value in the inspector.

Mix

Set to 100% by default.

Control the overall effect of the parameters in the Color group.

New in HK5

BLUR

Off by default.

New in HK5


Amount

Set to 10 by default.

The slider is limited to values between 0 and 100 but you can type values between 0 and 400 by clicking on the current value in the inspector.

SHARPEN

Off by default.

New in HK5


Amount

Set to 0.5 by default.

The slider is limited to values between 0 and 2 but you can type values between 0 and 100 by clicking on the current value in the inspector.

Radius

Set to 3 by default.

The slider is limited to values between 0 and 32 but you can type values between 0 and 400 by clicking on the current value in the inspector.

PIXELATE

Off by default.

New in HK5


Scale

Set to 20 by default.

The slider is limited to values between 1 and 100 but you can type values between 1 and 400 by clicking on the current value in the inspector.

SMOOTHING

Off by default.

New in HK5


Mode

The following options are available:

Low Pass

Set to 10 by default.

The slider is limited to values between 0 and 30 but you can type values between 0 and 100 by clicking on the current value in the inspector.

Adjust the amount of smoothing.

High Pass

Set to 1 by default.

The slider is limited to values between 0 and 5 but you can type values between 0 and 30 by clicking on the current value in the inspector.

Restore texture to the smoothed image.

Limit High Pass

On by default.

DESPILL

Off by default.

Choose the spill color you wish to reduce.

Color

The following options are available:

Brightness

Set to 0.2 by default.

The slider is limited to values between -1 and 1 but you can type values between -2 and 2 by clicking on the current value in the inspector.

The Brightness control lets you make manual adjustments to the brightness of the despill.

Saturation

Set to 0 by default. Only values between -5 and 5 are allowed.

The Saturation control lets you fine tune the saturation of the despilled areas, either to reduce it or increase it as required.

R

Set to 0 by default.

The slider is limited to values between -1 and 1 but you can type values between -2 and 2 by clicking on the current value in the inspector.

The three RGB sliders let you adjust the color of the despilled areas directly and intuitively for really fine-grained control of the result.

G

Set to 0 by default.

The slider is limited to values between -1 and 1 but you can type values between -2 and 2 by clicking on the current value in the inspector.

B

Set to 0 by default.

The slider is limited to values between -1 and 1 but you can type values between -2 and 2 by clicking on the current value in the inspector.

Amount

Set to 1 by default.

The slider is limited to values between 0 and 2 but you can type values between 0 and 0 by clicking on the current value in the inspector.

Use the Amount slider to increase or decrease the degree of spill suppression being applied.

Spill Map Depth

Set to 0 by default.

The slider is limited to values between -0.25 and 0.5 but you can type values between -0.25 and 1 by clicking on the current value in the inspector.

Use the Spill Map Depth control to increase the intensity of the Spill Map as necessary. This will enable you to target areas with only slight contamination but which you still want to despill.

Spill Map Balance

Set to 0.5 by default.

The slider is limited to values between 0 and 1 but you can type values between 0 and 0 by clicking on the current value in the inspector.

Adjusts the degree to which the Red or Blue are referenced (in the case of green screen, or Red and Green in the case of blue screen, or Green and Blue in the case of Red screen.)

Despill Color Space

Adjust the color space used in the Despill process.

Rec.709 seems to work best even with HDR material but you can select Rec.2020, ACEScg or Display P3 Linear for a different look - normally the resulting despilled image is slightly warmer.

New in HK5

The following options are available:

EDGE MATTE

Adjust the Width and Density sliders to taste - it's a very good idea to do this while looking at the Edge Matte view so you know exactly what you are doing. Normally the default edge width and density should be enough, but you may need to increase the values for problematic foregrounds or high resolution footage. Note that the Edge Matte view is not the matte used in Light Wrap.


Width

Set to 5 by default.

The slider is limited to values between 0 and 10 but you can type values between 0 and 100 by clicking on the current value in the inspector.

Density

Set to 2 by default.

The slider is limited to values between 0 and 5 but you can type values between 0 and 10 by clicking on the current value in the inspector.

Qualify

Off by default.

If you enable Qualify, you will see the Center, Angle and Spread controls appear and the Edge Matte view change with purple on the left hand side and yellow on the right, representing the two halves of a gradient matte. This is used in Edge Replace and Edge where additional controls will become visible.

If you enable Qualify, you will see the Edge Matte view change with purple on the left hand side and yellow on the right, representing the two halves of the gradient. The Value A sliders will now control the areas that are purple and the Value B slider sthe edges that are yellow.

You can adjust the Angle of the gradient any way you like - so for example you could have Value A at the top and Value B at the bottom by entering an Angle of -90 degrees. You can adjust the center of the gradient with the Center slider - negative values move the center closer to Value A and vice versa. Finally, the Spread slider allows you to adjust the spread of values across the gradient and hence the softness of the mix between the A and B values - a lower Spread value will make for a more abrupt transition between the two sides and a larger value will spread it out further.


Center

Set to 0 by default. Only values between -1 and 1 are allowed.

Angle

Set to by default.

Value must be between and .

Spread

Set to 1 by default.

The slider is limited to values between 0 and 2 but you can type values between 0 and 4 by clicking on the current value in the inspector.

EDGE REPLACE

Edge Replace allows you to replace the edge of the foreground with pixels further from the edge. Useful for dealing with a noticeable dark or light edge caused by excessive in-camera sharpening and chroma subsampling as well as the real world light wrap that is present in some shots.

It does this by eroding - Sample In - then blurring - Fill - the foreground and replacing the original foreground with these synthesized pixels in the area defined by the main Edge Matte. Amount controls the blend of the replacement with the original - a value of 1 replaces the original foreground entirely (providing the Edge Matte value is also 1).

NB. You can refine the area affected by Edge Replace with the Edge Matte controls.

You need to increase Sample In enough to avoid sampling the edge artefacts (by default Sample In is set to zero because the Fill process suffices for a lot of shots) and then push Fill just enough to ensure the edge pixels are replaced. The ideal setting for these controls is very much dependent on the color of the surrounding foreground pixels as well as the color of the background in the area you are replacing.


Enable

Off by default.

Fill

Set to 3 by default.

The slider is limited to values between 1 and 30 but you can type values between 1 and 100 by clicking on the current value in the inspector.

Sample In

Set to 0 by default.

The slider is limited to values between 0 and 20 but you can type values between 0 and 50 by clicking on the current value in the inspector.

Amount

Set to 1 by default. Only values between 0 and 1 are allowed.

— B —

When The Edge Matte is qualified you have the option to qualify Edge Replace with a gradient matte and the B controls appear. The A sliders will now control the areas that are purple and the B sliders the edges that are yellow. This allows you to target specific problem areas.


Fill

Set to 3 by default.

The slider is limited to values between 1 and 30 but you can type values between 1 and 100 by clicking on the current value in the inspector.

Displayed when Edge Matte - Qualify is enabled. Works on areas of the Edge Matte that are coloured yellow.

Sample In

Set to 0 by default.

The slider is limited to values between 0 and 20 but you can type values between 0 and 50 by clicking on the current value in the inspector.

Displayed when Edge Matte - Qualify is enabled. Works on areas of the Edge Matte that are coloured yellow.

Amount

Set to 1 by default. Only values between 0 and 1 are allowed.

Displayed when Edge Matte - Qualify is enabled. Works on areas of the Edge Matte that are coloured yellow.

EDGE

You can adjust the color (RGB Balance, Brightness and Saturation), transparency and blur of the edge. Note that unless Qualify is enabled, the A sliders are the master controls for the various edge corrections and the B sliders are not shown.

Each of these methods uses the same very thin matte which only encompasses the very edges of your foreground. Using this matte you can make detailed adjustments to the edge as required to help the foreground sit better into the background, compensate for edges that have been over-lit, or create special effects. The really powerful and unique feature of Edge in Hawaiki Comp Tools is that you can divide the edge in two and affect either side independently, using the Qualify option.


Enable

Off by default.

Brightness

Set to 0 by default.

The slider is limited to values between -0.5 and 0.5 but you can type values between -1 and 1 by clicking on the current value in the inspector.

Use the Brightness slider to adjust the brightness of the edge up or down as required.

Saturation

Set to 1 by default.

The slider is limited to values between 0 and 2 but you can type values between 0 and 3 by clicking on the current value in the inspector.

Adjusts the saturation of the edge as required.

R

Set to 0 by default.

The slider is limited to values between -0.5 and 0.5 but you can type values between -1 and 1 by clicking on the current value in the inspector.

Adjust the red channel of the Edge.

G

Set to 0 by default.

The slider is limited to values between -0.5 and 0.5 but you can type values between -1 and 1 by clicking on the current value in the inspector.

Adjust the green channel of the Edge.

B

Set to 0 by default.

The slider is limited to values between -0.5 and 0.5 but you can type values between -1 and 1 by clicking on the current value in the inspector.

Adjust the blue channel of the edge.

Transparency

Set to 1 by default.

The slider is limited to values between 0 and 1 but you can type values between 0 and 0 by clicking on the current value in the inspector.

Edge Transparency is a great way to soften any hard edges in your matte and give you a smoother-looking composite. It uses the same thin edge matte as the rest of the edge features and allows you to reduce the opacity of the foreground in that small area.

Blur

Set to 0 by default.

The slider is limited to values between 0 and 10 but you can type values between 0 and 100 by clicking on the current value in the inspector.

Set the blur radius with the Blur sliders. Edge Blur has a more subtle effect than the main Matte Blur.

In general, you want to avoid blurring your matte wherever you can to preserve as much fine detail as possible, but sometimes if your green/blue screen is not as good as it should be, you'll have unwanted "stepping" or aliasing of your edges, or some of the processing you have applied may have made them look a bit too sharp. If this is the case, your first step should be to make sure you have enabled Denoise (see above) which is specifically designed to deal with this type of issue and will handle it really beautifully and smoothly without compromising your matte. If your footage is really poor and Denoise doesn't get you far enough only then should you consider using Blur - after having first fired your cameraman and/or thrown away your camera!

If you are encountering serious aliasing problems, it usually means that you've over-processed the matte somewhere or other. Make sure you go back and review your previous decisions to see if you can improve on them before trying Blur. Hawaiki Keyer gives you more options for refining your matte than any other keyer so you should usually be able to find a good way of treating the problem without having to resort to blur.

NB. Changes to Edge transparency and blur change the matte and as such will be reflected in the Matte view

— B —

When The Edge Matte is qualified you have the option to qualify Edge Replace with a gradient matte and the B controls appear. The A sliders will now control the areas that are purple and the B sliders the edges that are yellow. This allows you to target specific problem areas.


Brightness

Set to 0 by default.

The slider is limited to values between -0.5 and 0.5 but you can type values between -1 and 1 by clicking on the current value in the inspector.

Use the Brightness slider to adjust the brightness of the edge up or down as required.

Displayed when Edge Matte - Qualify is enabled. Works on areas of the Edge Matte that are coloured yellow.

Saturation

Set to 1 by default.

The slider is limited to values between 0 and 2 but you can type values between 0 and 3 by clicking on the current value in the inspector.

Adjusts the saturation of the edge as required.

Displayed when Edge Matte - Qualify is enabled. Works on areas of the Edge Matte that are coloured yellow.

R

Set to 0 by default.

The slider is limited to values between -0.5 and 0.5 but you can type values between -1 and 1 by clicking on the current value in the inspector.

Adjust the red channel of the Edge.

Displayed when Edge Matte - Qualify is enabled. Works on areas of the Edge Matte that are coloured yellow.

G

Set to 0 by default.

The slider is limited to values between -0.5 and 0.5 but you can type values between -1 and 1 by clicking on the current value in the inspector.

Adjust the green channel of the Edge.

Displayed when Edge Matte - Qualify is enabled. Works on areas of the Edge Matte that are coloured yellow

B

Set to 0 by default.

The slider is limited to values between -0.5 and 0.5 but you can type values between -1 and 1 by clicking on the current value in the inspector.

Adjust the blue channel of the edge.

Displayed when Edge Matte - Qualify is enabled. Works on areas of the Edge Matte that are coloured yellow.

Transparency

Set to 1 by default.

The slider is limited to values between 0 and 1 but you can type values between 0 and 0 by clicking on the current value in the inspector.

Edge Transparency is a great way to soften any hard edges in your matte and give you a smoother-looking composite. It uses the same thin edge matte as the rest of the edge features and allows you to reduce the opacity of the foreground in that small area.

Displayed when Edge Matte - Qualify is enabled. Works on areas of the Edge Matte that are coloured yellow.

Blur

Set to 0 by default.

The slider is limited to values between 0 and 10 but you can type values between 0 and 100 by clicking on the current value in the inspector.

Set the blur radius with the Blur sliders. Edge Blur has a more subtle effect than the main Matte Blur.

Displayed when Edge Matte - Qualify is enabled. Works on areas of the Edge Matte that are coloured yellow.

Tone Curve Gamma

Set to 1.96 by default.

The slider is limited to values between 1 and 3 but you can type values between 0.01 and 5 by clicking on the current value in the inspector.

Edge Brightness and RGB can now work in a gamma space which you can set with the Tone Curve Gamma slider - defaults to the Final Cut Pro default of 1.96. Colour adjustments are more fine grained especially when when the foreground is dark. Set to 1.0 to revert to the current behaviour in HK 4.5 Edge Tools.

New in HK5

FINE EDGE

Fine Edge allows you to darken the outer edge and brighten the inner edge of the foreground’s semi-transparent (grey matte values) pixels. Quite sophisticated results can be achieve with a look that differs from the main Edge brightness.


NB.Use BG requires the Background dropzone to be populated as it uses the luminance of the background image to adjust the process.

Enable

Off by default.

Brighten Inner

Set to 1 by default.

The slider is limited to values between 1 and 2 but you can type values between 1 and 5 by clicking on the current value in the inspector.

Darken Outer

Set to 0 by default. Only values between -1 and 0 are allowed.

Use BG

Off by default.

Amount

Set to 0.5 by default.

The slider is limited to values between 0 and 1 but you can type values between 0 and 2 by clicking on the current value in the inspector.

BACKGROUND MATCH

Background Match automatically adjusts the edges of the foreground to match the color and brightness of the background. If a foreground pixel is darker than the background it will be brightened and if lighter than the background, darkened but only in the area defined by the Edge Matte. Background Match can be used as an alternative or complement to Light Wrap.


IMPORTANT NOTE: - It's important to note that in order to use this feature, you need to add your background image to the Background source well. Without a background image being fed to the plug-in, you won't get the desired result.

Enable

Off by default.

Color Amount

Set to 1 by default. Only values between 0 and 1 are allowed.

Brightness Amount

Set to 1 by default. Only values between 0 and 1 are allowed.

Saturation

Set to 1 by default.

The slider is limited to values between 0 and 2 but you can type values between 0 and 3 by clicking on the current value in the inspector.

Clamp

On by default.

Amount

Set to 0.5 by default.

The slider is limited to values between 0 and 2 but you can type values between 0 and 3 by clicking on the current value in the inspector.

LIGHT WRAP

Light Wrap simulates the indirect illumination of the scene, which is where the background colors wrap themselves around the edges of the foreground. This can be very useful in helping the match between the keyed foreground and the new background.

Toggle the Light Wrap switch to enable this feature, and adjust the amount, depth (the distance that the Light Wrap overlaps the foreground), the brightness and the saturation.

Select from five different blend modes for light wrap: Screen, Add, Overlay, Soft Light, and Multiply.

Just remember that a little of this effect goes a long way, so it's best not to overdo it - gauge the amount you need depending on the illumination level of the new background.


Enable

Off by default.

Blend Mode

The following options are available:

Amount

Set to 0.25 by default. Only values between 0 and 1 are allowed.

Depth

Set to 3 by default.

The slider is limited to values between 1 and 10 but you can type values between 1 and 20 by clicking on the current value in the inspector.

The distance that the Light Wrap overlaps the foreground.

Brightness

Set to 0 by default.

The slider is limited to values between -0.5 and 0.5 but you can type values between -0.5 and 1 by clicking on the current value in the inspector.

Saturation

Set to 1.5 by default.

The slider is limited to values between 0 and 3 but you can type values between 0 and 5 by clicking on the current value in the inspector.

Luma Match

Set to 0 by default.

The slider is limited to values between 0 and 1 but you can type values between 0 and 0 by clicking on the current value in the inspector.

Allows you to match the original luma of the foreground but mix in the color from the background. This control can also be used to subtly reduce Light Wrap brightness.

Background Blur

Set to 3 by default.

The slider is limited to values between 0.5 and 5 but you can type values between 0.5 and 100 by clicking on the current value in the inspector.

Control the amount the background is blurred when creating the light wrap.

EDGE BLEND

Edge Blend is a really sophisticated compositing technique used by visual effects artists to put the finishing touches to a great composite. It works by taking another very thin matte that encompasses the composited foreground and background, and then creates a subtle blend of foreground and background just in that small area. It's a great way of making your keys look more photorealistic and less artificial.

In general, the only control you will need to adjust for Edge Blend is the Amount slider, which determines the intensity of the effect. The Blend slider adjusts the blend of foreground and background, but in almost all cases you will find that the default value of 3.0 is the right blend amount for your needs. However, you might need to increase this value when using source footage that is 4K and upwards.


IMPORTANT NOTE: - It's important to note that in order to use this feature, you need to add your background image to the Background source well. Without a background image being fed to the plug-in, you won't get the desired result.

Enable

Off by default.

Blend

Set to 3 by default.

The slider is limited to values between 1 and 10 but you can type values between 1 and 20 by clicking on the current value in the inspector.

Amount

Set to 2 by default.

The slider is limited to values between 0 and 4 but you can type values between 0 and 10 by clicking on the current value in the inspector.

PREMULTIPLY

Combines the background and foreground where the matte is transparent.


IMPORTANT NOTE: - It's important to note that in order to use this feature, you need to add your background image to the Background source well. Without a background image being fed to the plug-in, you won't get the desired result.

New in HK5

Enable

Off by default.

Additive

Set to 0 by default.

The slider is limited to values between 0 and 1 but you can type values between 0 and 0 by clicking on the current value in the inspector.

When the Additive slider is set to 1 you are combining the background with the unpremultiplied foreground. When set to 0 it is the standard source over blend mode. In practice increasing additive raises the brightness of the edge of the foreground.

Amount

Set to 1 by default.

The slider is limited to values between 0 and 1 but you can type values between 0 and 2 by clicking on the current value in the inspector.

Use Color

Off by default.

Changes the background image used in Light Wrap, Background Match, Fine Edge - Use BG, Edge Blend and Premultiply from the background image well to the color selected in the On Color swatch.

On Color

Set to
black by default.

Pick the color used by the On Color view and when Use Color is enabled.


Background

Lets you provide additional media to the effect.

The user interface varies by host:

Drop Zones in Final Cut Pro
Drop Zones in Motion
Video Track Menu in Premiere Pro
Layer Menu in After Effects

BACKGROUND

Set the background image used by the Background Match, Light Wrap, Fine Edge, Edge Blend and Premultiply operations and in the Composite view.


Fit Background

Off by default.

Resize the background image to match the foreground. Check the new Background view to see the results.


Fitting Method

The following options are available:

Scaling

Choose the scaling algorithm used to resize the background image.

The following options are available:

Centered

On by default.

Pixel Aligned

On by default.

Blend Mode

When the Background dropzone is populated you can bypass the host compositing by switching the View menu to Composite and using one of 30 blend modes to composite the foreground with the background. This can be handy in complex timelines where you are using a lot of layers. The Opacity slider controls the opacity of the foreground.


NB. Blend modes also work with the On Color view. Enable Use Color when using this view mode for Light Wrap, Edge Blend,Background Match,Fine Edge and Premultiply to use the color selected with the On Color picker.

The following options are available:

Opacity

Set to 1 by default.

The slider is limited to values between 0 and 1 but you can type values between 0 and 0 by clicking on the current value in the inspector.

External Matte

Lets you provide additional media to the effect.

The user interface varies by host:

Drop Zones in Final Cut Pro
Drop Zones in Motion
Video Track Menu in Premiere Pro
Layer Menu in After Effects

EXTERNAL MATTE

HK5 gives you the ablity to bring in an external matte for use by the Comp Tools.


IMPORTANT NOTE: For External Matte to function correctly, it's really important that your external image is formatted correctly - if for any reason it's not the exact same size and aspect ratio as your timeline, please make sure to create a compound clip of it (Final Cut Pro), put it in a flattened group (Motion), nest it (Premiere), or precompose it (After Effects). The plug-in is expecting to see an image that is the same aspect ratio as your timeline - the host application has no way of telling the plug-in that you have used something different. If you have applied any kind of spatial transform (position, crop, scale or rotate) to your external matte, the same thing applies and you will need to preformat it in the same way. And the same thing applies if you have applied a spatial transform to the shot that you are trying to key. In each case, preformatting will give you the correct result, while failure to do this will mean that the images are out of register with each other.

Mode

Use the dropdown menu to select how the External Matte is combined with the matte generated by the keyer.

There are many uses for this option, but an obvious use for Add (or Max) is to create a hold-out matte, and for Multiply (or Min) to create a garbage matte. Replace is useful if you simply want to use the spill suppression and other finishing options of Hawaiki Keyer but the matte from another instance of Hawaiki Keyer or another keyer.

The following options are available:

Channel

Pick the channel of the external matte to use as a matte: Red, Green, Blue or Alpha.

NB. HK4 always used Red and expected a black and white matte.

New in HK5

The following options are available:

Clamp

Off by default.

Enable clamping of output values.

New in HK5


Output Min

Set to 0 by default.

The slider is limited to values between 0 and 1 but you can type values between -10 and 10 by clicking on the current value in the inspector.

Set the minimum output value.

Output Max

Set to 1 by default.

The slider is limited to values between 0 and 10 but you can type values between 0 and 1000 by clicking on the current value in the inspector.

Set the maximum output value.

Resolution Independence

On by default.

RESOLUTION INDEPENDENCE

Maintain consistent effects when changing resolution.

The baseline parameter can be used to set the relative strength of the parameters - increasing will decrease the strength. Or you can set it to match the behaviour you are used to in Hawaiki Keyer 4 - simply match the Baseline to the resolution of your footage. Lastly, if Resolution Independence is not enabled and you then copy and paste an instance of the keyer to a clip with a different resolution - enable Resolution Independence on the new clip and set the baseline to the width of the first clip - this will ensure the parameter strength matches.


Resolution Independent Parameters :

  • Matte: Shrink - Grow
  • Matte: Blur
  • Matte Cleaner: Fill Holes
  • Edge Matte: Width
  • Edge Replace: Sample In
  • Edge Replace: Fill
  • Light Wrap: Background Blur
  • Light Wrap: Depth
  • Edge Blend: Blend
  • Image - Smoothing: High Pass
  • Image - Smoothing: Low Pass
  • Image - Pixelate: Scale
  • Image: Blur
  • Image - Sharpen: Radius

New in HK5

Baseline

The following options are available:

Width

Set to 3840 by default.

The slider is limited to values between 1 and 8192 but you can type values between 1 and 16384 by clicking on the current value in the inspector.

Manually set the Resolution Independence Baseline.

Presets

Presets contain a snapshot of your effect configuration. While no built-in presets are available, you can still save and load your own preset files.

When you save parameter configuration to a file on disk, this file can later be loaded to recreate the same effect configuration. Presets generated in one video application can be used by the same plug-in running in a different video application.

How do I use the presets popup menu?

The built-in presets allow you to save any of your keys for future use, or you can customise a default layout of the plug-in.