Hawaiki Color - Manual


Effect Options
New in version 1.5, there are now three different options to select from in the Effects Browser, with corresponding adjustment layer versions available in the Titles Browser.
- Hawaiki Color offers a version with the Grading Guide enabled.
- Hawaiki Color Fullscreen offers the fullscreen overlay version with the grading guide disabled - great for more experienced users who knows their way around the controls, as you can grade without the overlay having any impact on the scopes.
- Hawaiki Color SD will automatically detect whether your clip is 4:3 or 16:9 and change the interface accordingly.
New in Hawaiki Color 1.5.1 - support for Apple Silicon Macs.
System Requirements
macOS: Mojave 10.14.6, Catalina, Big Sur
FxFactory: 7.2.4 +
Apps: Final Cut Pro 10.4.7 +
M1 (Apple silicon) Macs: require Final Cut Pro 10.5.3 +
Onscreen Controls

 Temperature
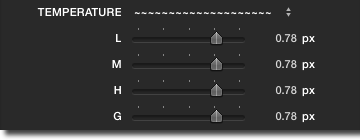
Adjust the temperature of the shot in four bands for Lows, Mids, Highlights and Global. Moving the slider upwards increases the warmth of the shot and moving it downwards cools down the temperature. Useful for white balance adjustments in conjunction with the Green/Magenta controls in the Inspector.
Temperature
Adjust the temperature of the shot in four bands for Lows, Mids, Highlights and Global. Moving the slider upwards increases the warmth of the shot and moving it downwards cools down the temperature. Useful for white balance adjustments in conjunction with the Green/Magenta controls in the Inspector.
 Exposure
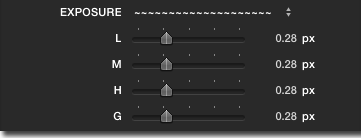
Adjust the luminance of the shot in four bands for Lows, Mids (Gamma), Highlights and Global. Moving the slider upwards increases the exposure and moving it downwards reduces it.
Exposure
Adjust the luminance of the shot in four bands for Lows, Mids (Gamma), Highlights and Global. Moving the slider upwards increases the exposure and moving it downwards reduces it.
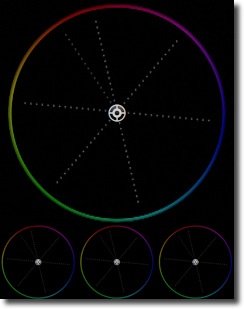 Color Wheels
Adjust color of Lows, Midtones, and Highlights by sliding the puck in the direction of the desired color. Or reduce a color cast by moving the puck in the opposite direction.
Guides ("graticules") align with FCP Vectorscope color targets when Phase is set to Vector (the default).
Adjust the sensitivity of the wheels using the Inspector controls (see below).
To reset any of the color wheels use the reset options in the Inspector.
Color Wheels
Adjust color of Lows, Midtones, and Highlights by sliding the puck in the direction of the desired color. Or reduce a color cast by moving the puck in the opposite direction.
Guides ("graticules") align with FCP Vectorscope color targets when Phase is set to Vector (the default).
Adjust the sensitivity of the wheels using the Inspector controls (see below).
To reset any of the color wheels use the reset options in the Inspector.
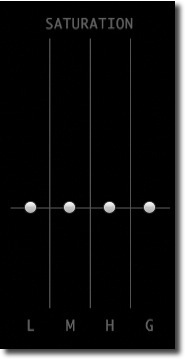 Saturation
Adjust the saturation of the shot in four bands for Lows, Mids, Highlights and Global. Moving the slider upwards increases the saturation of the shot and moving it downwards reduces it.
TIP: Desaturating the highlights or the shadows slightly can be a very useful shortcut to cleaning up unwanted colors in those areas. You can also achieve a range of interesting looks by selectively targeting individuals bands: for example desaturating the blacks (Lows) can give a little of the silver retention look of the classic ENR process especially when combined with boosting the Contrast.
Saturation
Adjust the saturation of the shot in four bands for Lows, Mids, Highlights and Global. Moving the slider upwards increases the saturation of the shot and moving it downwards reduces it.
TIP: Desaturating the highlights or the shadows slightly can be a very useful shortcut to cleaning up unwanted colors in those areas. You can also achieve a range of interesting looks by selectively targeting individuals bands: for example desaturating the blacks (Lows) can give a little of the silver retention look of the classic ENR process especially when combined with boosting the Contrast.
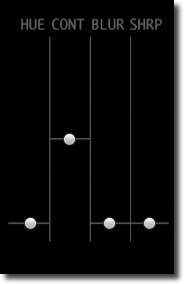 Hue, Contrast, Blur, Sharpness
Adjust the hue of the shot (0-360°), the contrast, the blur and the sharpness. Moving the sliders upwards increases the value of the parameter and moving it downwards reduces it.
TIP: The Blur control is useful if you want to achieve diffusion looks (see the section on Blend Modes below). In most cases you will not want to use the Hue control unless you are trying for an unusual look.
Hue, Contrast, Blur, Sharpness
Adjust the hue of the shot (0-360°), the contrast, the blur and the sharpness. Moving the sliders upwards increases the value of the parameter and moving it downwards reduces it.
TIP: The Blur control is useful if you want to achieve diffusion looks (see the section on Blend Modes below). In most cases you will not want to use the Hue control unless you are trying for an unusual look.
Reset: Option-clicking on any slider control will reset the value to zero. Holding down the option key enables you to see which values have been changed from their defaults.
Important Note: If you have any kind of transform applied to your clip, the Hawaiki onscreen interface will not display correctly, as FCP applies the transform after the effect. In this case, make it a compound clip before applying the Hawaiki effect and adjust your transforms inside the compound.
The same thing applies if you are using source material that does not conform to the standard 16:9 aspect ratio. Again the correct method is to create a compound clip before applying Hawaiki Color.
Inspector Controls

- Bypass Grade - click this checkbox to show the original ungraded source. This will work in any of the View modes, and also once you have committed your grade.

-
Commit Grade - this checkbox locks your grade and displays it fullscreen without any overlays no matter what view mode you are in. The onscreen controls remain visible but these do not show in your final render or in the scopes. This is handy if you want to go back and tweak your grade at any time without having on un-Commit the grade.
When Commit Grade is checked, the VIEW menu and the Fullscreen and Grading Guide checkboxes are disabled.
-
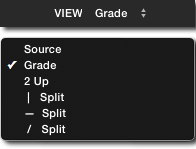
View menu - choose to view the grade, the source, or the source together with the grade in 2-Up mode or with a splitscreen view in a choice of vertical, horizontal or diagonal splits.

-
Fullscreen - activating this checkbox allows you to grade in fullscreen view with the grading interface and controls subtly overlaid over your clip.
The View menu modes are available in this view as well.

-
Grading Guide - deactivate this checkbox to remove the entire grading interface from the viewer.
TIP: The onscreen controls are still visible allowing you to adjust your grade. This can be especially useful when wanting to accurately check the scopes.

-
Onscreen Controls - deactivate this checkbox to remove the slider and wheel controls from the viewer.

-
Wheel Outlines - Activating this checkbox enables an outline to the color wheels that doesn't show in the scopes.
On by default in Hawaiki Color Fullscreen and Hawaiki Color SD.
-
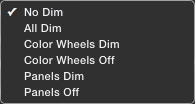
DIM menu - choose to dim the whole grading interface, dim the wheels and panels independently, or turn the wheels or panels off.
-
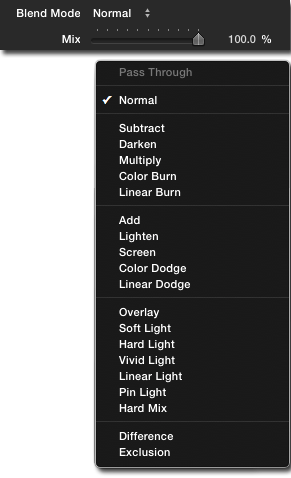
Blend Mode menu - lets you combine the grade with the original shot using a variety of standard blend modes.
-
Mix slider - controls the strength of the overall grade.
The default is 100%.
If you’re happy with the overall effect but want to dial it back a little, then lower the mix value by moving the slider to the left.
Create white diffusion effects using the Blur controls together with Screen Blend Mode, or black diffusion using Multiply Blend.
Or experiment with different combinations to achieve advanced looks.

-
Legalize - clips the luma signal within a "legal" range of 0 to 100 IRE. Note that by default Hawaiki Color does not clamp the signal to these levels in order to make it possible to use the full dynamic range.

-
Color Wheels
Mix - adjusts the mix of the color correction applied by the color wheels. Useful if you like the color wheel correction but want to tone it down a little without having to rebalance all three color wheels.
Strength - adjusts the sensitivity of the color wheels. Useful if you want more fine grained control than the default settings, or if you want to make bolder adjustments.
Drag to the left to increase the sensitivity, drag to the right to reduce sensitivity and increase the strength of your adjustments.
TIP: This doesn’t change the work you’ve already done, which means you can switch to a different way of working at any point.
LMH - reset the onscreen controls for the Lows, Midtones and Highlights Color Wheels.
-
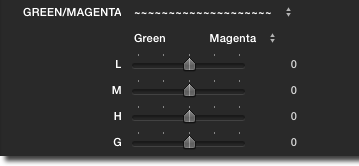
Green/Magenta - Adjust balance of green and magenta in the shot in four bands for Lows, Mids, Highlights and Global. Moving the slider left increases the amount of green, moving the slider right reduces the amount of green adding a magenta cast.
TIP: Use in tandem with the temperature controls to adjust the white balance of your shot.
-
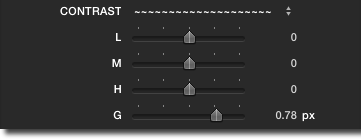
Contrast - Adjust the contrast of the shot in four bands for Lows, Mids, Highlights and Global. Moving the slider right increases the amount of contrast, moving the slider left reduces the amount of contrast.
The global control allows you to reset the onscreen global contrast control via the inspector. While you can adjust global contrast via the inspector slider it is recommended you use the onscreen control.
-
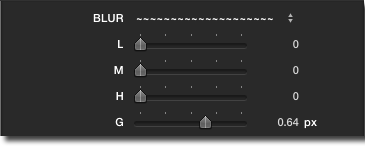
Blur - Adjust the blur of the shot in four bands for Lows, Mids, Highlights and Global. Moving the slider right increases the amount of blur.
The global control allows you to reset the onscreen global blur control via the inspector. While you can adjust global blur via the inspector slider it is recommended you use the onscreen control.
-
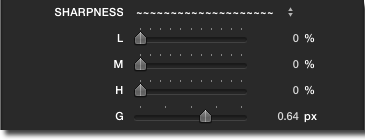
Sharpness - Adjust the sharpness of the shot in four bands for Lows, Mids, Highlights and Global. Moving the slider right increases the amount of sharpness.
The global control allows you to reset the onscreen sharpness control via the inspector. While you can adjust global sharpness via the inspector slider it is recommended you use the onscreen control.
-
Temperature - Reset the onscreen controls for Temperature for Lows, Midtones, Highlights and Global.
While you can adjust Temperature via the inspector sliders it is recommended you use the onscreen controls.You can also reset the Temperature onscreen controls by option-clicking the control.
-
Exposure - Reset the onscreen controls for Exposure for Lows, Midtones, Highlights and Global.
While you can adjust Exposure via the inspector sliders it is recommended you use the onscreen controls. You can also reset the Exposure onscreen controls by option-clicking the controls.

-
Saturation - Reset the onscreen controls for Saturation for Lows, Midtones, Highlights and Global.
While you can adjust Temperature via the inspector sliders it is recommended you use the onscreen controls. You can also reset the onscreen Saturation controls by option clicking the controls.

-
Hue - Reset the onscreen controls for Hue.
While you can adjust Hue via the inspector slider it is recommended you use the onscreen controls.You can also reset the onscreen Hue control by option-clicking the control.

-
Sharpness Calibration - Adjust the radius and amount of the sharpness controls for Lows, Midtones, Highlights and Global. The onscreen Global Sharpness control and inspector sliders for Lows Midtones and Highlights sharpness control the mix.
TIP: These controls allow for sophisticated sharpening effects, for example increasing the local contrast in the Midtones only, but be careful not to overdo these effects.
